Welcome to the first in a series of sew-alongs I will be posting as a result of my busier-than-ever schedule! Today's sew-along will the the View D pants of Simplicity 4192. With summer winding down I wanted to make these as a final send-off of sorts. Plus, who doesn't want wrap pants to wear to the beach or pool (or lake, if one of those is available) instead of skirts like everyone else has. Ha!
 |
| We're doing the pants in view D |
The whole idea of having no outside side seams had me very curious, but now that I've made these, I think they're ingenious. A little awkward looking to put on if you don't have 4 pairs of hands, but super simple and great-looking once they're tied.
Let's get started!
Supplies:
Simplicity pattern 4192
Fabric (I used about 3 yds)
Thread
Sewing Machine
Scissors
Choosing a fabric for this project was pretty easy for me. The same day that my local fabric store had a sale on Simplicity patterns, they were having a major sale on apparel fabrics. Bins of the stuff for $1-$3 per yard. It may limit the range of colors and patterns you can choose from, but especially for patterns you're not too sure about, it's a good way of making a "test" pair without breaking the bank. So, I picked up 3 yds (total, they were actually two scraps about 1 1/2 yds each) of a silky feeling striped fabric. More on that later though.
First you'll want to determine your size for this pattern. Simplicity has the different sizes all laid out in a table on the back of the pattern envelope. I decided to make these a bit bigger than usual, because I figured I'd rather be safe than sorry with the amount of overlap on the sides. In retrospect, I could've gone down a size, no problem.
Cut out your pattern pieces (or make a copy and then cut that out). I cut mine straight from the original pattern tissue because I got the pattern for 99 cents. For the View D pants, you'll need pieces 10, 11, and 12 (which is just the ties).
 |
| Pattern piece 11 laid on the fabric |
Fold your fabric right sides together so you have two layers of your fabric and cut out your pattern pieces. Like I mentioned, I had gotten two pieces of fabric that were each about 1 1/2 yards. They pretty much perfectly fit the pattern. I got lucky. Especially since I didn't want those stripes to be horizontal.
 |
| Two pattern pieces done, four to go! |
Once your two back pieces and two front pieces are cut out, mark the darts indicated on the pattern tissue. Honestly you should probably do this with chalk or disappearing fabric markers, but I didn't have those on hand. Ok, I had the chalk on hand, but it wouldn't stick to this fabric. So I used blue pen and pins. Just be super careful if you do this.
 |
| Can you see the pins marking my darts? |
Pin the darts using pins perpendicular to the fold of the fabric.
 |
| I used a pen to mark the beginning and end points of the dart again |
Now sew the darts, starting at the waist and going down to the point. Just sew right off the fabric. Don't backstitch or anything. Just tie a little knot at the point where it comes off the fabric and clip the leftover thread. My fabric ended up being super slippery and hard to work with in this step, so I used a paper towel to back it up and help my sewing machine get traction. There's a trick to it, let me show you:
 |
| Just lay the fabric on top of the paper towel |
By putting a piece of paper towel underneath the slippery fabric, the lower feed dogs of the machine can keep pushing the fabric up and it doesn't get as hung up. Then, once the seam is sewn (see how I went right off the side of the dart?) you can carefully tear away the stabilizing layer of paper towel.
 |
| Back of stitching line |
 |
| Tearing away one side first |
The little fuzzies left behind by the paper towel can be picked up with a piece of tape. Carefully. I'm sure you could use other materials to stabilize the fabric, but make sure they will rip easily so they don't mess up your stitches.
 |
| Paper towel all ripped out |
Once the darts are sewn on all four pant pieces, press them. The pattern instructs you to press them toward the crotch curve, so go ahead and do that.
 |
| Finished and pressed darts |
Sew a stay-stich (or serge) across the top so the darts stay in place from here on out. Here's the right side of a front pant piece with the darts sewn and pressed:
 |
| Right side of fabric |
Now lay the front pant pieces on top of the back pant pieces, right sides together, and pin the inner leg seams. You should end up with two halves of the pant, each pinned from the bottom to the crotch curve (but not along it).
 |
| Back and front, pinned at the inseam |
Press the seams open, so you have two enormous half leg pieces. They are huge. I could have made a kids' tent. Haha, all that fabric to fit one leg... don't feel too self-conscious at this point.
 |
| Pressing open the inner leg seam |
I finished my seams by serging them before I sewed the seam, but you can finish the seams however you like. Zig-zag stitching seems to be popular, and if your fabric isn't the type to unravel itself you can just trim it with a pair of pinking shears (those zig-zag scissors).
 |
| Serged before sewn |
Next we'll be sewing together the crotch curve, so pin that bad boy up! Make sure that the two front pieces are together, and the two back pieces are together, right sides together. Match any notches indicated on the pattern, as well as the inseams we sewed up earlier.
 |
| Matched and pinned |
Sew or serge the crotch curve. You now have the pants more than halfway done!
 |
| I just serged the crotch curve together |
Here's another look at those nicely finished insides. If you don't have a serger, fear not! Just use a zig-zag stitch to catch the edges after you've sewn the curve.
 |
| Nice and neat |
If you have a good, stable fabric, this next part should be easy. If it's as shifty and slippery as mine... patience, and lots of it. We need to make a narrow hem around the whole pants. That's really the only down-side to this pattern, I think, and I'm surprised I didn't think of this when I was looking at the pattern in the store. Since there is no side seam, of course those edges still need to be finished! I serged around the whole hem (there are technically two hems, one for each leg) to start, and then folded it over twice. You can just fold it over twice, serging it just helped keep my fabric more stable when I folded it over itself.
 |
| So. Many. Pins. |
See? Fold once, then again to hide the raw edge.
 |
| Twice folded |
Sew the whole thing down with a narrow seam allowance.
 |
| As narrow as I could make it |
You'll be seeing this for a long time... so much hem!
 |
| It never stops... |
Once the hem is sewn, the pants are really more or less finished! We just need to add the ties to the top. I didn't follow the instructions for this section because I was really just kind of over it, and I wanted to be done sewing after all that hemming. Cut out the four pieces of pattern piece 12.
 |
| Four pieces total, laid right-sides together in pairs |
With the right sides together, lay the ties in pairs and pin one short end (this is going to be the center) on each pair. Sew these together, so you have two long straps of fabric.
 |
| My seam allowance was a bit big, but they still fit just fine |
Now here's where I decided to stop following the pattern... If you don't want conspicuous topstitching on the ties, keep following the pattern. If you don't care about topstitching, and want to make things a bit easier, just follow me! I basically turned the straps into bias binding strips. Fold it in half once (wrong sides together), then open it and fold the edges in. Then fold it in half again to hide the raw edges inside.
 |
| Making my ties bias binding style |
Here's a closer look at the inside of the strip. I didn't fold the edges all the way in to the middle like I normally do, but if you want a really narrow tie I'm sure you could. Then just fold this in half.
 |
| Edges folded in |
I had to use pins to keep it folded... mercy, this fabric has had me bending over backwards. But I still made a pair of pants for under $5, so I'm not really complaining.
 |
| Pinned to keep it from jumping apart |
Once you've got the two ties made, lay one down by the back of the crotch curve, and the other by the front.
 |
| One tie for each side |
Pin the tie to the top of the pants, matching the center seam of the tie with the front crotch seam (or back, if you're pinning the back tie).
 |
| Pin carefully, keeping fabrics straight |
Here's both ties pinned to their respective sides:
 |
| All pinned |
Fold the short edges of the ties under just a bit to hide those last raw edges, then topstitch along the whole tie, making sure everything is going to be nice and secure.
 |
| The ties are topstitched and the pants are done! |
Close-up of the topstitching... I really don't mind it, but the stitching is hidden if you follow the instructions Simplicity gives.
 |
| Neat enough for me |
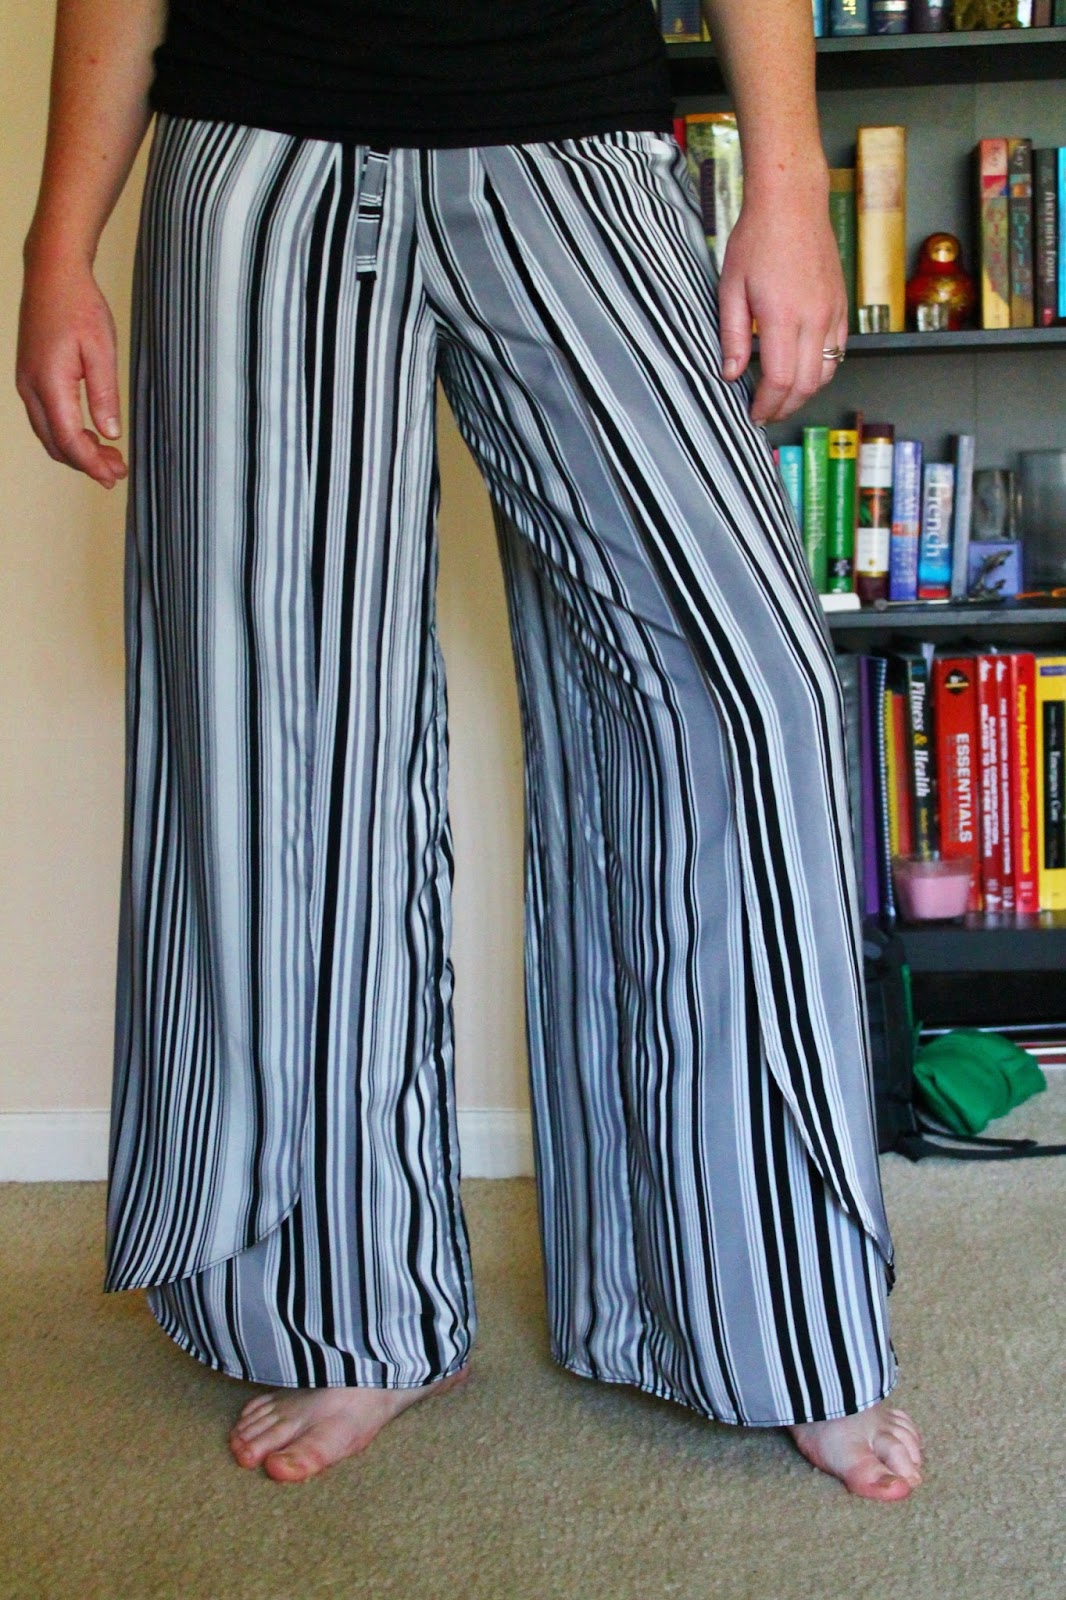
And that's Simplicity 4192 pants view D done! Congratulations! The instructions show you how to tie them, too, but it's pretty easy to figure out. Basically you tie the front portion to you first, around your back, then pick up the back piece behind you and tie that around the front. It comes together very nicely.
 |
| Simplicity 4192 Pants View D |
The stripey pattern of these pants is also kind of a trip for me... I really didn't expect it to look so busy, and from the back it's fine. But the front has got me confused which piece belongs to the front vs. back. I totally know how a lion feels sizing up a herd of zebra now.
 |
| They drape so lovely |
From the back the pants almost look like a skirt, which I think is kind of awesome. Because I like the look of long skirts, but they can be a hassle when it comes to running around. Pants don't have that problem. And am I still worried about accidentally flashing everyone with the open sides? Nope. There's plenty of overlap, and the material drapes in a way that keeps you securely hidden, even when you crouch down real quick to catch a kiwi you almost dropped on the kitchen floor.
 |
| Those stripes... |
Now a few last things about my fabric. It feels great, the pants are very nice and flowy. As long as they don't have a static charge. This fabric becomes static-y very quickly, and then it clings a bit in the front, so I'm trying to find a solution to static right now. Also, since I made the pants pattern a size bigger, I feel there is extra roominess in the sides. I actually kind of like that, but make of that what you will.
Thank you for following along, and if you made these pants with me, I hope you are enjoying your new wrap pants! So, if anyone has a suggestion for reducing static, I would greatly appreciate hearing it, because otherwise I may have difficulty wearing these out and about. And if you have any questions or comments, as always, leave them down below!
Happy Sewing,
Lea


No comments:
Post a Comment