Hello, and welcome to another tutorial on Straight Eight!
Today I will be showing you how to make a neat little roll-up organizer for your long pointy objects that need a home other than loose in the bottom of a drawer. In my case, it just happens to be chopsticks. One of our friends recently went on a trip to Asia, and came back with beautiful chopstick sets for DH and I. Add that to a few that we've had lying in the silverware drawer because we didn't want to keep buying the throw-away take-out kind, and we are now swimming in chopsticks that don't have a proper place in our kitchen! So, what to do other than at least make an organizer for them all?
 |
| Cute holder for all our chopsticks... or half. |
The nice thing is that by tweaking a few of the measurements, you could just as easily make a case for crochet hooks or knitting needles, which I know from experience can get lost under several balls of yarn in a craft drawer, as well. And you can choose whatever fabrics you like for this project to make it as simple or fancy as you like!
Supplies:
Main Fabric (1/3 yard)
Lining Fabric (1/3 yard)
Batting (1/3 yard)
Bias Binding (88" total; 40" main fabric, 48" lining fabric)
Ribbon/Tie/Etc. (28")
Thread
Sewing Machine
Safety Pin
Scissors
Ruler
*optional: Serger, Pinking Shears, Basting Spray, and Fray-Check
 |
| Batting, lining, and main fabrics |
Recognize the fabric? I had a few scraps left over from the Star Wars pajama pants, so this is where I'm going to use it. Makes my little nerdy heart happy.
My measurements are based off of the chopsticks I needed to fit into the case, which are about 9-10 inches long and fit well into an inch-wide pocket. I made the case to fit 10 pairs. If you are making the case for a set of knitting needles, you may want to make the case taller, or shorter if you are making it for crochet hooks. Your preference.
Here are the measurements for your fabrics:
Main:
2x (13.5" x 10.5")
Lining:
2x (13.5" x 6.5")
2x (11" x 2")
2x (3" x 10.5")
 |
| Main and lining fabrics cut out |
Batting:
1x (13.5" x 10.5")
1x (13.5" x 6.5")
1x (11" x 2")
1x (3" x 10.5")
 |
| Batting cut out |
If you want to make the bias binding out of the main and lining fabrics, go ahead and cut those pieces now, too. I didn't think about it until I was about halfway through my project, so I didn't take any pictures, but hopefully you know how to make bias binding. If not, let me know and I'll post another tutorial.
Once the fabrics are cut, make some sandwiches! So the main fabric pieces go on each side of the biggest batting piece (right sides out), etc.. If your fabric is slippery (like my lining fabric) use some basting spray to help keep them together neatly. Here's mine all stacked up on one another:
 |
| This is the layout I'll be using, more or less |
Next we'll attach the binding to the lining pieces, so the edges look nice and neat when we sew everything together. I just added my binding to the inside edges of the lining pieces because I wasn't too worried about the side of that little top flap showing since I'd planned on serging it. But be aware that while it will be hidden most of the time behind the side panel, the left side of that top flap will be visible on the finished project, so you might want to add the binding over that as well.
 |
| Binding across one of the long sides on each piece |
 |
| Close-up of the binding |
Now lay the biggest lining piece down over the main fabric sandwich. If your fabric has a direction, or you want a certain side facing outward, make sure you take care of that now, before we sew it down.
 |
| Main fabric sandwich and big inner pocket lined up |
Sew once all around the border to make sure the fabrics and batting won't shift on you in the next few steps. Make sure the sewing line is within your final seam allowance, however, since we don't want to see it later. I used a very narrow 1/8" seam on this, I think.
 |
| Sewn all around the edges |
Add your pockets for the chopsticks/crochet hooks/knitting needles at this point. If your sewing machine came with a walking foot and spacer (that awkwardly clunky looking foot and the odd bar thing that connects to it) this might be a good time to use it. I just didn't feel like changing my feet, so I used my universal foot. It works, just a little more trouble lining things up. Also, I said earlier that I was only adding 10 pockets. That really large one of the left will be covered up by the side panel, so it's basically useless. Each of my pockets is about 1 inch wide.
 |
| 10 pockets |
Finish the side seams (at least to the left side) of the top flap and sew it down on the main fabric sandwich. I serged both my sides, although only the left really needs it. We'll be sewing the right side down later, so it doesn't really matter. I just serged it to be fair.
 |
| Top flap added |
Once the top flap is secure, add the left side panel (I suppose you could change the configuration to have the panel on the right, but I did it this way). See how that big pocket got covered? Sew another narrow seam to keep it in place.
 |
| All flaps and panels and pockets are in place |
I opted to round my edges on the panel side... purely aesthetic. Feel free to skip this step if it doesn't tickle your fancy, but I thought it made the closure look more neat. Just use a round object (I had a demitasse on hand) and trace the new round edge.
 |
| No espresso drinkers in this house, but we have a demitasse... |
Sew a zig-zag around the edge of the whole case now, following your new curves. Clip off any leftovers. Or, use a serger, and let it do the clipping for you. I really use just about any excuse to pull out my serger...
 |
| Nearly complete case |
Now, if you're using ribbon you can skip this step, but if you are going to make your own ties, here's how I did it. Cut a piece of fabric about 28 inches long. How wide is dependent on how wide you want the ties. Mine was way too wide and I clipped it later.
 |
| 2 inches wide... could've gone with 1 inch wide |
Sew a tube however wide you want the tie (with right sides together), and clip the seam allowance with some pinking shears. Or normal scissors, but pinking shears help if your fabric likes to unravel.
 |
| Trimmed to size |
Use the safety pin (attached to one end of the tube) to turn the whole thing right side out. This can take a while. And patience. Lots of patience.
 |
| Finished tube |
Next, get out that bias binding for the outside of the case. I used some bias binding I'd made from the main fabric. Make sure it was cut on the bias and has some stretch! Those curves are going to be a real pain otherwise...
 |
| Main fabric bias binding |
Fold the bias binding in half (lengthwise) to find roughly the middle. Mark that spot and make a buttonhole there that's the length of the ribbon or tie width that you are using. This will make more sense in a bit, but the picture below should help with how to orient your buttonhole on the bias binding.
 |
| I used a tiny zig-zag stitch to make my buttonhole |
Finish the ends of your ties by folding and sewing them, knotting them, or simply dabbing a little Fray-Check on them to stop any unraveling. I was a little lazy here and used the Fray-Check, I'll admit.
 |
| That wet spot is just the Fray-Check sinking in |
Next, mark the center of your left panel. You want the ties to be centered, don't you?
 |
| The ruler slid a bit, but I got the center |
Fold your tie/ribbon in half to find the middle, then cut it.
 |
| Snip snip! |
Sew the (now) two ties/ribbons where you marked the center of the left panel. Give them just enough room on the fabric to be sewn securely, but not too much that they'll peek out from the binding in a bit!
 |
| Sewn onto the edge with 2-3 lines of stitching |
That buttonhole you made in the bias binding can now slip over the ties so that the binding is flush with the side of the case. Pretty nifty, eh?
 |
| Slide the buttonhole down to the bottom of the ties |
Starting at the buttonhole, sew the binding onto the case on either side. I sewed both sides of the binding at the same time, but you could do it the traditional way, I suppose. Pull on the binding slightly as you go around the curves to make the fabric lie smoothly. The ends of the binding can be joined on the opposite side of the case and sewn down.
 |
| That's it! |
Check the binding to make sure every corner and edge was caught on both sides.
 |
| Looks fine to me |
 |
| A nice smooth curve because the binding was cut on the bias and stretched |
Here's the back of the new case, all bound around the edges and neat. And a little nerdy. So great!
 |
| Star Wars chopstick case... woohoo! |
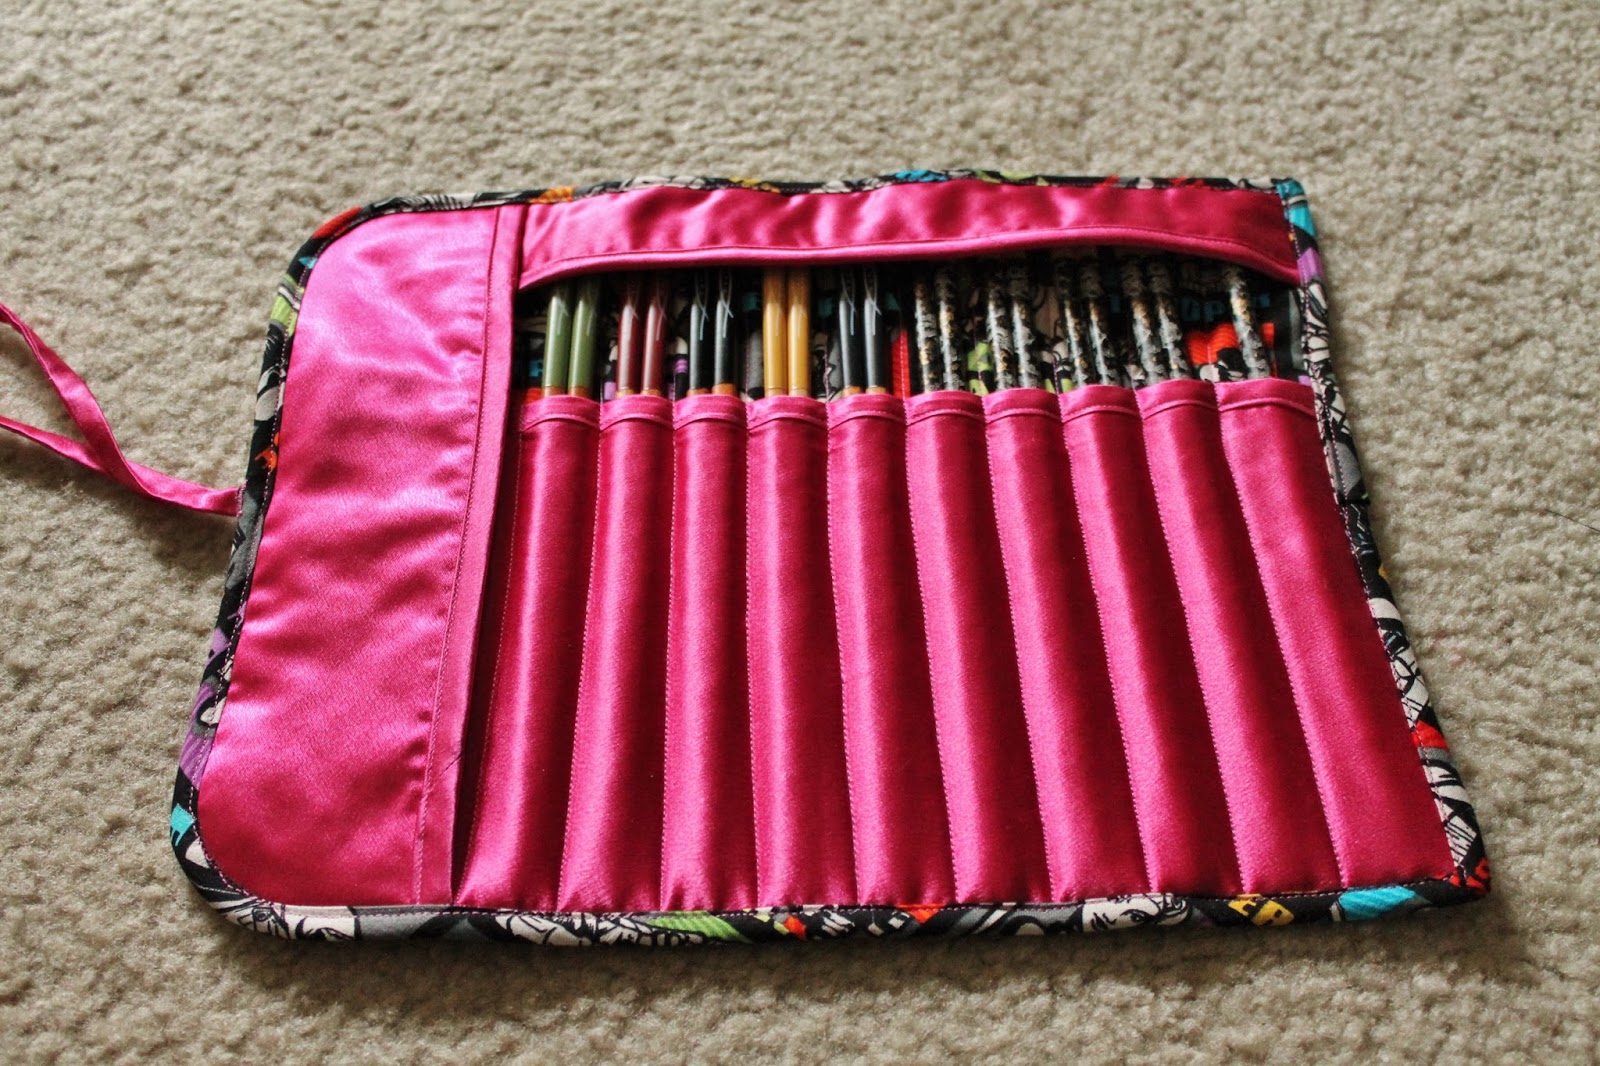
And here's the inside, with a few of our chopsticks in the pockets. Yes, I am missing one of the chopsticks from the set on the right... those are the ones we bought ourselves a long time ago. And that's why I don't want them all flying around the bottom of the silverware drawer. They get lost like left socks in the wash.
 |
| Nice and safe |
Making this case gave me a few considerations for the next one (since we still have 2 more sets to safely store away). For one, I would probably leave out the batting in the lining fabrics. It just makes rolling up the case a bit bulky, and doesn't add a ton more protection. Also, I might add some snaps so I can safely put my chopstick rests into that left panel. It's a good pocket even without them, but I don't want the rests to fall out whenever I unroll the pouch.
 |
| Finished case, unrolled |
 |
| Finished case, rolled and tied |
I am so happy with this new case, and I can't wait to make another one! Which will definitely happen soon, because we have more than just 10 sets of chopsticks. For two people. Who don't have a lot of guests. Haha, I still love having every single one of them... it's like spoons, you don't just have two in a household of two.
Hopefully this tutorial was useful for you, as well, and you've made yourself a great new roll-up case for whatever long and thin objects you needed to provide with a little home! If there were any unclear directions, please let me know in the comments, I'd be happy to fix them. Enjoy your new cases, and feel free to share!
Happy Sewing,
Lea


No comments:
Post a Comment